


If you own a dog, it’s critical to ensure that they have an ID tag. Attaching dog tags to a collar is essential for your dog’s safety. Whether it’s a simple stainless steel tag or even a rose gold engraved dog tag for your precious pooch, this will help them get home if they ever get lost.
However, many dog owners may not know how to put a dog tag on a collar properly.
Believe it or not, attaching a tag on a collar can be trickier than one might think, especially for different kinds of attachments. If a dog escapes without a proper ID, it can be a traumatic experience for both the dog and the dog owner. Moreover, when a tag ring breaks, it can leave the pet tag vulnerable to getting lost.
In this blog, we’re going to clear up any confusion surrounding various attachment types and teach you everything you need to know about how to attach a dog tag to a collar.
Why Dog Tags Are Essential

Understanding the importance of dog tags and the variety of options available can further emphasize the need for securely attaching them to your pet’s collar.
- Immediate identification: Should your dog get lost, anyone who finds them can immediately identify and contact you. This is often the quickest way for a lost pet to be reunited with its pet owner.
- Legal requirement: In many places, it’s legally mandated for dogs to have an ID tag when in public spaces. This is not only for identification purposes but also to show that the dog has had its necessary vaccinations. Pet owners should always be aware of these requirements.
- Peace of mind: Simply knowing that your pet has a pet tag can give you peace of mind when you’re out and about. Even if your dog is well trained, unforeseen circumstances can lead them astray, especially if the dog’s leash breaks or the dog escapes.
How to Attach Dog Tags to a Collar: Common Attachment Types

Before we dive into the various ways that dog tags can be attached to dog collars, it should go without saying that the first step to attaching your dog’s ID tags is to take the collar off your dog. Otherwise, your pup is likely to want to jump on you, cuddle, play, and generally make it difficult to put a dog tag on. This is especially true if you have yet to get your dog used to wearing a collar.
It’s crucial to approach this task with the dog’s safety in mind, ensuring there’s no undue pressure on the dog’s neck during the process.
That aside, here are the most common collar tags attachment types:
The S-Hook
One of the most common dog tag attachments, S-hooks are a simple and effective way to attach a dog tag to a collar. However, this method requires pliers to pinch shut.
If you choose to use an S-hook, simply use a pair of pliers to bend one end of the hook so that the tag can be slipped onto the attachment. From there, bend the hook back into place and pinch the hook shut. Finally, repeat this process on the other end, hooking the attachment onto the metal D-ring of the dog collar and pinching it shut.
Be aware that pinching each end shut is critically important. If not closed properly, the opening can snag onto your dog somewhere and injure them in the process.

While this may sound a bit implausible, there have been numerous documented cases of this happening. For this reason, many folks may opt for the safer split-ring attachment method.
The Split Ring
Split rings are a potentially safer attachment method than the S-hook. Additionally, there are no tools required for this job.
To attach a dog tag using a split ring, simply open the ring along the divide and slip on the dog tag via the dedicated hole. From there, simply guide it along the ring until it is completely attached. Then, do the same thing with the metal D-ring on your dog’s collar.
Because of how quick, simple, and effective this method is, many people choose to attach their dog’s tags this way. However, do be aware that split rings are less sturdy than S-hooks and can get bent out of shape if caught on something.
Elastic Straps
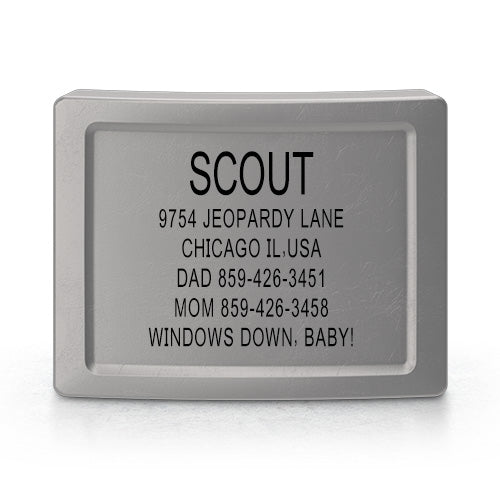
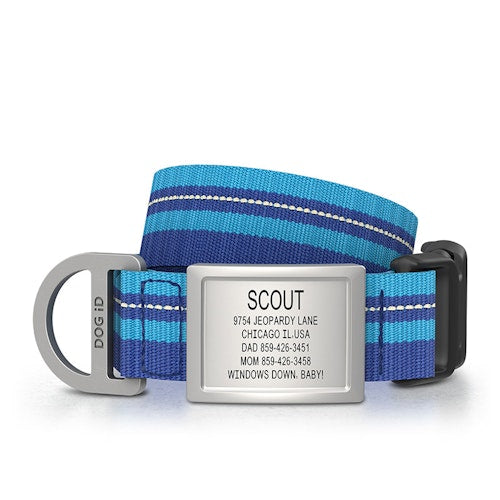
A third option is to avoid the pitfalls of the previous attachment methods and instead opt for the elastic loops utilized by DOG iD. Using this approach, you simply slip the dog tag onto your dog’s collar, opposite the metal D-ring to keep the tag from getting scuffed.

Since this attachment method keeps the dog tag much closer to the body, it is less likely to get snagged on anything. Plus, it just takes a couple of seconds to slip on, no tools required. Just note that these won’t work with Martingale collars.
If you want a closer look, check out our video on how to attach DOG iD tags to your dog’s collar.
Customizing Your Dog’s Tag

Now that we understand the common attachment types for dog tags, let’s delve into the customization options available:
- Materials: Gone are the days when stainless steel was the only option. Today, dog tags come in a range of materials, from durable plastics to luxury metals like gold or silver. Depending on your budget and style preferences, there’s a tag out there that’s perfect for your pup.
- Shapes and sizes: From bones to hearts, stars to rectangles, the array of shapes allows pet owners to choose a design reflective of their pet’s personality. Remember to consider the size of your dog and the weight of the tag—a large, heavy tag might not be suitable for a small breed.
- Information to include: At a minimum, a dog tag should include the pet’s name and owner’s contact number. However, some owners also choose to add addresses, alternate phone numbers, or even the medical needs of the dog.
- Design and aesthetics: With advancements in technology, it’s now possible to have tags with intricate designs, graphics, or even a photo of your pet. Some services also offer glow-in-the-dark tags, which can be useful for nighttime visibility.
- QR code tags: A modern twist to the traditional dog tag, some tags now come with QR codes. When scanned, they can provide the person with more information than what’s physically written on the tag, such as additional contact numbers, medical records, or even the dog’s dietary requirements.
Further Considerations When Attaching Dog Tags

While you’ve been introduced to the three most common methods and customization options for attaching dog tags, there are some other factors to keep in mind when deciding which method and option to use:
Multiple Tags on One Collar
Many pet owners like to have more than one tag on their dog’s collar. For instance, one could be an ID tag, another could be a rabies vaccination tag, and yet another could be a microchip notification tag. If you’re attaching multiple tags, make sure they are not stacked atop one another, as they may get tangled or worn out due to friction.
Noise Factor
It’s common for dog tags to clink against each other when the dog moves. While some owners don’t mind this sound, others find it annoying. If you belong to the latter group, consider using a tag silencer. These are rubber or silicone frames that go around the tag to muffle the sound. Alternatively, you can opt for slide-on tags that fit directly onto the collar without dangling.
Ease of Transfer
You might occasionally want to switch your dog’s collar, perhaps due to wear and tear or simply to give your dog a new look. When selecting an attachment method, consider how easy it will be to transfer the tags from one collar to another.
Durability and Longevity
While some tags are lightweight and may not wear out quickly, others might be heavier and more prone to causing wear on the attachment. Depending on your dog’s activity level and the weight of the tag, some attachments might last longer than others.
Safety First
Remember that the primary purpose of the tag is to ensure the safety and return of your dog should they get lost. Ensure that the attachment method you choose keeps the tag secure but also remains safe for the dog. You wouldn’t want the tag to become a choking hazard or for it to get caught on something during your dog’s adventures.
Other Unique Attachment Methods
Though the three methods mentioned above are the most common, there are some other unique and innovative attachments in the market. Some owners prefer slide-on tags, which slide onto the collar like a belt loop. These are especially great for active dogs as they don’t dangle or make noise. Another alternative is the snap-on tag, which snaps directly onto the collar.
Final Thoughts

Choosing the right attachment method for your dog’s tag is crucial for ensuring their safety and also for your peace of mind. Every dog is unique, so what works best for one might not be suitable for another. Always take into consideration your dog’s size, habits, and activity levels when making a decision.
Don’t forget to check the tag and its attachment regularly for any signs of wear and tear. The last thing you’d want is for your dog’s ID tag to go missing when it’s needed most. And, as always, ensure that the information on the tag is up-to-date and easily readable.
If you’re looking to buy custom dog tags for your dog, check out our safe, sleek and easy-to-attach options.
Image Credits
Source: alexei_tm/Shutterstock.com
Source: Mega Pixel/Shutterstock.com
Source: DOG iD